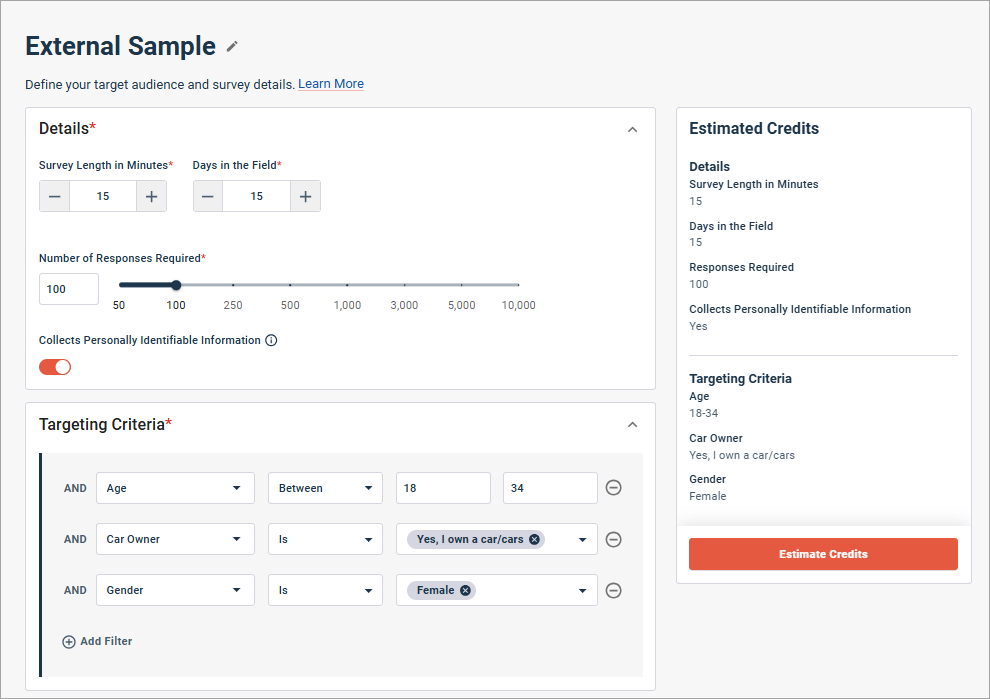
Need a third party sample to respond to your survey? Use the
External Audiences tab to distribute the survey to
participants outside of your community.
Prerequisites:
Creating an external audience and submitting the audience details is
equivalent to distributing your survey to a third sample immediately. Before
you begin, plan your distributions carefully:
-
Survey authoring
Your survey should have completion, disqualification, and over
quota points for different types of participants. Include best practice
elements like speed check, trap, and red herring questions. Ensure you test
your survey thoroughly before distribution.
For more information, see
Third party sample integration.
-
Credits
Ensure you have enough credits to purchase the sample you're
requesting. As you fill out the details, qualification criteria, and incidence
rate, the application will display the estimated cost. To purchase more
credits, please contact your Customer Success Manager.
-
Quotas
The current release of this feature does not support quotas. To
work around this, create separate external audience requests for each quota
segment.
-
Soft launch vs. full launch
The current release of this feature does not allow you to
delineate soft launches vs. full launches. To work around this, create separate
external audience requests: one for 10% of the full sample size you require,
and then another request for the remaining 90%.
-
Supported languages
The current release of this feature only supports en-US third
party samples. Do not use this feature if you require a third party sample in
another language.
Note:
- Third party samples are
available for modern surveys only. They are not available for classic surveys,
recruitment surveys, power surveys, forums, external activities, or video
discussions.
- For any issues with this
workflow, please contact Alida Technical Support.
-
Go to the Surveys app and open a survey.
-
Click the
Distribute tab.
-
In the left menu, click
External Audiences.
-
Click
New Audience.
-
Type a name for the external audience and click
Create.

-
Type the
Survey Length in Minutes.
-
Type the
Days in the Field value.
-
Specify the
Number of Responses Required.
- Optional:
Turn the
Collects Personally Identifiable Information
toggle on or off.
If your survey asks participants for sensitive data or personally
identifiable information (PII), turn on this toggle to ensure that you are
getting participants who have consented to sharing this type of information.
-
Add
Targeting Criteria.
The targeting criteria are based on profile data from the third
party sample provider. This is where you define the traits of audience you are
trying to reach.
Note: If you don't see the targeting criteria you need listed here,
you must ask participants for the information in your survey and use survey
logic to advance or disqualify participants.
-
Select the criteria.
-
Set the operator.
The operators vary depending on the profile data type.
| Profile data type
|
Operators
|
- Numeric
(for example, Age)
|
|
- Single
Choice
- Multiple
Choice
|
|
-
Enter the targeting criteria values.
| Operator
|
Description
|
| Between
|
Specify the start and end of the
numeric range.
|
| Is
|
Select the check boxes beside all
applicable values.
|
-
Click
Add Filter to add another filter
condition.
-
Click the remove button beside a filter condition to remove
it.
-
Type the
Incidence Rate.
The incidence rate is an estimate of the percentage of people who
received the invitation and who meet your criteria,
after the targeting variables specified under
Targeting Criteria are taken into account.
For example, let's say you want to target female participants
between the ages of 18 and 34 who have attended a live theater event in the
last 6 months.
You can control for gender and age by sending invitations to only
females ages 18-34. That's what happens when you define age and gender under
Targeting Criteria. Therefore, you only have
to focus on the
"has attended a live theater event in the last 6 months" part
and the percentage of participants who meet this condition will be your
incidence rate.
To estimate your incidence rate:
- Separate your criteria
into two groups: the ones you can target with
Targeting Criteria and the ones you can't.
- For the criteria you
can't target, estimate the percentage of the targeted population that meets
each condition.
Here are some key considerations regarding incidence rate:
- An incidence rate
below 40% indicates a demographic that may be difficult, expensive, or
impossible to find. Consider loosening your criteria to increase the number of
potential participants. Alternately, please work with Alida's Managed Services
team to get a custom quote.
- The more conditions
you add, the smaller the number of potential participants who can meet all of
them.
-
When you are finished, click
Estimate Credits.
Result: The Estimated Credits calculator on the right-hand side
updates and displays how many credits are required for your desired external
audience.
-
To update audience details and get a new estimate, click
Edit.
-
To proceed with the distribution, click
Confirm.
-
Click
Send Survey.
-
Click
Confirm and Spend Credits to confirm the
credit deduction from your account.
