 Create
an in-survey quota
To create in-survey quotas for a specific survey, create a quota check and then add quotas to it.
The application does
not support more than 50 in-Survey quotas, so you may experience performance
issues if this limit is exceeded.
- In Power Survey Authoring, click the Questionnaire tab.
- Click Folder and then select Quota Check.
-
In the
New Quota Check dialog, type a name for the
quota check and then click
OK.
Note: This is the name for the quota check, not for the in-survey quota.
-
Create or select a quota.
- To create a new quota, click New.
- To use an
existing quota, select a quota from the
Quota list and then click
Edit.
If the survey does not contain any quotas, the Edit button does not appear.
Note: If you edit an existing quota in a quota check, that quota is changed in all other quota checks that contain it.Result: The Question Editor opens and displays an editing area for the quota check. -
Enter or edit the information in the following fields:
- Quota Name: The name of the quota that appears on the Quotas tab when you look at all the quotas in a survey.
- Target Count: The number of members required to meet this quota.
- Check
For: The option to check whether the quota is met or not met.
- Full: The quota
checks for how many survey completes meet the quota target. After the quota
target is full, participants can answer questions within the quota check
folder.
Example The quota is for 500 males. Participants are directed past the quota check folder until the quota target is reached. After this point, male participants are directed into the quota check folder.
- Not
Full: The quota checks for how many survey completes meet the quota
target. If the quota target is not full, participants can answer questions
within the quota check folder. Once the quota target is full, participants can
still complete the survey, but they will not see the questions within the quota
check folder.
Example The quota is for 500 males. Participants are directed into the quota check folder until the quota target is reached. After this point, male participants are directed past the quota check folder.
Note: When an in-survey quota is set to Not Full, the Current Count column in the Quotas tab continues to count participants who are directed past the quota check folder after the Quota Target is met. However, only the participants who meet your quota are directed into the quota check folder.
- Full: The quota
checks for how many survey completes meet the quota target. After the quota
target is full, participants can answer questions within the quota check
folder.
- Send Email: The option to automatically email the Project Manager when the target count has been reached.
-
On the
Questions tab, select the questions you want
to add to the quota.
A question is a piece of information about your members. For example, a question can be the member's city, the number of points earned, or a response to a survey question.Note: Using a recode as the basis for a quota is not recommended. Saved changes to recodes are immediate and do not require publishing if the survey is live. Therefore, your survey logic may be affected.
-
On the
Include tab or the
Exclude tab, add the filter conditions.
Option Steps To add a condition - Click the gear
icon, and then select
Add Condition.

- Complete the condition.
- Click the question, and then select the desired question from the list.
- Click the preposition, and then select the desired preposition from the list.
- Depending on the question, select a list item, type a value, or select a date.
To add a condition group - Click the gear
icon, and then select
Add Condition Group.

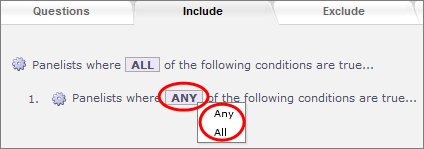
- Select whether any
or all of the conditions must be true for the condition group to be true as a
whole.
- If any of the conditions in the group must be true, select Any.
- If all of the conditions must be true, select All.

- Beside the new
condition group, click the gear icon, and then select
Insert Condition.

The condition is added inside the condition group.
Note: If you select Add Condition or Add Condition Group, the condition or condition group is added outside of the original condition group. - Complete the condition.
- Click the question, and then select the desired question from the list.
- Click the preposition, and then select the desired preposition from the list.
- Depending on the question, select a list item, type a value, or select a date.
- Click the gear
icon, and then select
Add Condition.
- Click Save.