Import data

Import data to update your survey data, or to import data from a survey that was conducted outside the community.

Prerequisites:
  • There must be a record of the member in the Community for data to be mapped to the system.

    If you upload a new response record, the record is not recognized in power surveys until the member takes the survey.

Note:
  • If you are distributing a power survey to panelists outside of your community, you cannot use the Imports tab to import data because there is no email address to link the data to. For more information, see Import data into a power survey for external samples.
  • If data is imported into a survey for participants who don't have a response status, they are marked as Complete.
  • You cannot import data directly into recodes. Any recodes must be removed from the question list and import file or the import will fail. For more information, see Delete a recode.
Importing example

You are conducting a survey for an airline, and your survey is designed for members who have flown with your airline at least three times in the past month. Instead of asking each member the question "How many times have you flown with us in the last month?", you import this information into the application from the airline's customer database.

For information on how participation statistics and system questions are updated when you import data, see Changes to participation statistics and system questions.

  1. Create a CSV or SPSS import file.
    How you create the file depends on how many variables you want to import.
    Option Description
    Few variables Manually create the CSV or SPSS file and then populate the fields with the data that you want to import.
    Many variables Create a survey that contains the questions you want to import. Then export this survey to either CSV or SPSS. This step creates a blank file that contains the necessary fields. Then you can then copy the data into the file and import it back into the application. For more information, see Export data.
    Note:
    • The first column of the CSV file must contain one of the following unique identifiers:
      • PanelistIdQuestion
      • PanelistAlternateId
      • PanelistEmail
  2. Create a data import.
    1. In Power Survey Authoring, click the Imports tab.
    2. Click New Import.
      Note: Importing data affects the participation statistics for individual members. If you do not want the survey data to update the participation statistics, on the Details tab, from the Include in Participation list, select No.
    3. In the Confirm Import Settings dialog, click OK.
    4. In the Study Import dialog, type a name for the import and click OK.
      The import must have a unique name.
  3. On the File Upload page, enter or select the import options.
    1. Optional: In the Import Name field, edit the import name.
    2. From the File Format, select one of the following options:
      • CSV
      • Unicode CSV
      • SPSS
    3. From the Delimiter list, select the character that separates the values in the import file.
      Note: SPSS files do not require a delimiter.
    4. To select the file, click Choose File, navigate to the import file on your computer, and then click Open.
    5. To add or delete the questions that appear in the import, click Add or Remove Questions to Map to.
      In the Question Picker, right-click the question and select Add or Delete.
      In addition to the data in the import file, you can import the following system questions:
      • CompletedDate
      • StartedDate
      • InvitationDate
      Note:

      The CompletedDate, StartedDate, and InvitationDate are displayed in Pacific Time (PT) (UTC-8). When you use these system date questions in filters or conditions in reports or surveys, convert your preferred time to PT (UTC-8).

      For example, to find participants with a CompletedDate before 09:00 Eastern Time (UTC-5), set the condition to CompletedDate is before 06:00 PT (UTC-8).

    6. From the Select Data Source list, select Live or Test data.
    7. In the Import Options section, clear or select the following options:
      • Mark responses as Complete: Marks all responses in the survey as complete.
        Note:
        Clear this option in the following situations:
        • You have a reserved sample that you plan to invite at a later date.
        • You want to preserve the statuses of participants who are at various points in the survey; for example, Invited or Disqualified participants.
      • Only import record matches for panelists in study: Updates only those records that match the members in the survey.
        Note: Clear this option to update all records that match members in the survey and to insert records for matches at the Community level. Any records that only match members in the Community are inserted into the survey with a status of Complete.
  4. Click Next Step.
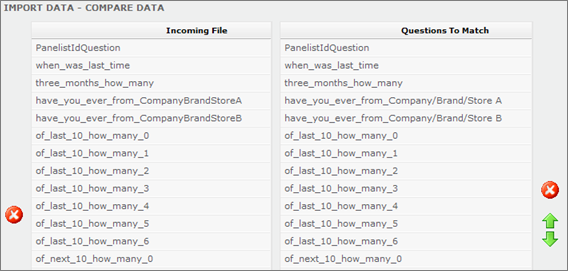
  5. On the Compare Data page, ensure that each question in the Incoming File section is matched to the correct survey question on the right.
    The first question on the left must be a unique member identifier such as the AlternateID, an email address, or a club card number. You need this identifier to match the member IDs within your community.
    • To remove an unwanted question, click the red X button.
    • To rearrange the questions on the right to match the ones on the left, click the green arrows.
  6. Click Run Import.
Note:
The BrowserStats system question is not supported for newly imported or created surveys. The imported data does not contain the BrowserStats system question, and any references to this system question do not work. Instead, use one of these following system questions to collect similar data:
  • OSType
  • BrowserType
  • BrowserVersion
  • PluginType
  • BrowserExperience
  • DeviceType
  • RespondentExperience