 Create a Single Choice or Multi Choice
Buttons question
Add a Single Choice or Multi Choice Buttons question to your survey.
- In Power Survey Authoring, click the Questionnaire tab.
-
On the
Authoring Navigation Bar, do one of the
following:
- To create a Single Choice Buttons question, hover over Question > Single Choice, and then select Single Choice Buttons.
- To create a Multi Choice Buttons question, hover over Question > Multi Choice, and then select Multi Choice Buttons.
-
Type a name for the question, and then click
OK.
For guidelines on question names, see Question names.
-
Add the question text.
-
Click the
Question field, and then type the
question text.
For information on formatting the text and adding files such as images, see Editing toolbar.
- Click Update.
Note:- The application automatically removes any Javascript that you add to question text, instruction text, or content boxes.
-
Click the
Question field, and then type the
question text.
-
Add the buttons.
-
In the
Answer Text field of the first button,
type the answer text.
Note: If your answer text contains a word that is more than 90 characters, the word will appear outside the button.
- Optional:
For Multi Choice button questions, to make the answer
exclusive, select the
Exclusive check box.
If participants select an exclusive answer, they cannot select any other answers.
-
To add another button, do one of the following:
- To add one button, click Add Answer, and then type the answer text.
- To add multiple
buttons, click
Answer Text, and then select a
predefined set, or type each answer text on a separate line.
Press Ctrl + V to paste multiple answers from a text editor such as Notepad.
Note: After a survey contains live data, you cannot delete or batch edit answers.
-
In the
Answer Text field of the first button,
type the answer text.
- Optional:
To allow participants to provide a verbatim answer, add
an "Other-Specify" button.
- Click Add "Other-Specify" Answer.
- In the Answer Text field, type the answer text.
-
Select or clear the
Required check box.
If selected, participants must type something in the verbatim field.
- Optional:
Set the
Answer (Other-Specify) answer to
automatically purge the text field data after the
participant becomes inactive.
-
After you add the
Answer (Other-Specify) answer, click
Save.
Result: The question properties are refreshed.
-
In the
Properties section, under
Sensitive Data, click
Treat other/specify text response as sensitive
data.
Note:
- Only Admins can change this setting.
- Sensitive Data is available on request. For more information, see Purging sensitive data.
- You cannot recover the answer data after it is purged.
-
After you add the
Answer (Other-Specify) answer, click
Save.
- Optional:
Add an image to each button.
-
Click the
Select image button.

- Optional:
To create an image-only answer, select the
Image Only Answer check box.
 Note: If you add an image to a question or answer option without adding alt text in the Question or Answer text fields, the titles for corresponding questions, rows, or columns will be blank in your report.
You cannot use the button image to pipe a selection in an image only answer into another question. For more information, see Choice, Numeric, Date, and Open End questions in Pipes and question types. -
Click the
Select image button.
-
In the
Properties section, set the properties for the
question, answers, and display.
For more information on the question properties, see Button question properties.
-
In the
Properties section, click the
Button Tint field, and select a color.
Alternatively, enter a hexadecimal color value. To find hexadecimal color values, do an Internet search for hexadecimal color codes.
- Click Save.
-
Change the button layout in the custom layout settings.
Note: These question properties are not supported for mobile surveys. Any changes you make to these question properties are not rendered for mobile participants.
-
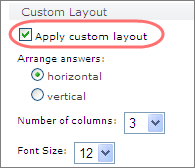
In the
Properties section, select the
Apply custom layout check box.
 Result: The custom layout properties become available.
 - To set the answer direction, under Arrange answers, select horizontal or vertical.
- To set the number of columns, from the Number of columns list, select a number.
- To set the text font size, from the Font Size list, select a size.
- Click Save.
For more information, see Custom Layout in Button question properties. -
In the
Properties section, select the
Apply custom layout check box.
Note: Some features, such as
scripts, pipes, and exclusive answers, may not function properly when you
preview the question. For best results,
use the Test Mode toolbar to test the
question.