Invite participants to an instant video discussion
Invite participants to an instant video interview. You can set up video discussions with up to 16 attendees, including moderators and observers.
-
You must be an Admin, or a Power User, Author, or Video Discussions User with the Can schedule distributions permission to send distributions.
- Create a video discussion. Set Meeting Type to Instant Interview.
-
You must schedule a video discussion before you invite participants.
-
Click the
App Drawer and select
Activities, and then select your scheduled
video discussion activity.

- On the activity toolbar, click the Distribute tab.
-
Select an invitation option:
- In the top right, click New > Invitation.
- On the left menu, click External Invitations > New > External Invitation.
- On the left menu, click Hub Invitations > New Hub Invitation.
- In the Create New Invitation dialog, enter a name for the invitation and click Create.
-
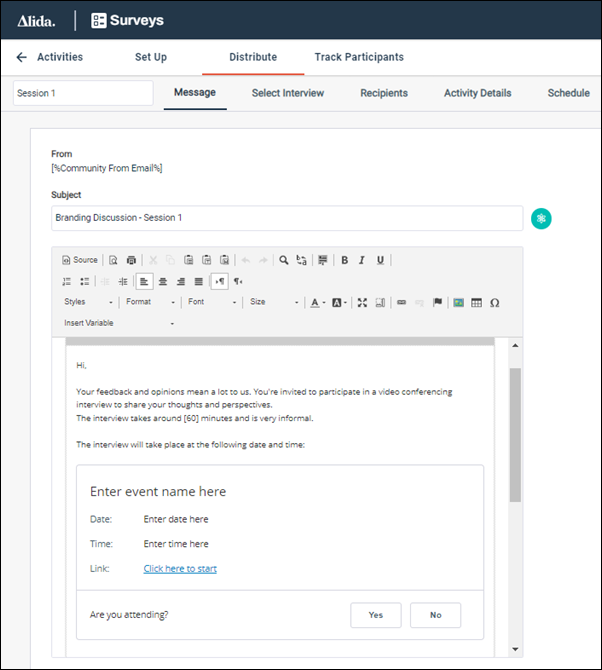
In the
Message tab, update the email message with any
information specific to your video discussion, such as the length of the video
discussion and the date and time when it will take place.
If you selected New > Invitation the Message tab displays an invitation template that you need to edit with your video discussion details.

- Click the Select Interview tab, and select the video discussion to invite participants to.
-
Click the
Recipients tab, and add recipients in one of
the following ways:
- Select an existing member filter from the Recipients drop-down list.
- Create or edit a member filter.
- Manually invite recipients.
Use this option if you plan to distribute the activity outside of your Community.
-
Use this option if you plan to distribute the activity outside of your Community.
Note: The meeting room can record up to 16 participants (for example, 1 moderator and 15 interviewees). Please be mindful of this limit if you invite more than 15 interviewees. -
If you selected an existing member filter, or created a new member
filter, you can select only a specific subset of members to send the invite to.
Note: The selected member filter cannot include more than 500 users.
-
In the
Confirm Filters dialog box, click the
Select Participants tab.
You can use the Select Participants tab if your initial member filter yields fewer than 500 members, and you can select up to 50 members.Note: The Select Participants tab is only visible if you are an admin or a user with the Can access sensitive data permission enabled.
- Click the checkbox next to the name of each member to include.
- Click Save.
-
In the
Confirm Filters dialog box, click the
Select Participants tab.
- Optional: If you want to change the Member Facing Activity Name, click the Activity Details tab and enter the new name.
-
If you want to schedule the invitations to be sent at a later
time, click the
Schedule tab.
- Under Send Date, select Later.
- Click inside the Date field, and then select the date from the calendar.
-
From the
Time menu, set the time at which the email
will be sent by doing either of the following:
- Type the time according to the required format, and press Enter.
- Click inside the Time field, and then select the time from the menu.
The Time setting is based on your computer's time zone. - Optional:
You can choose to send a test email to preview the invite:
-
In the
Select Interview tab, verify that you have
selected an interview.
You must select an interview in order to successfully send a test email.
- Click Test Email.
- Enter the email, or a comma-separated list of emails, to send the test to.
- Click Send Test.
-
In the
Select Interview tab, verify that you have
selected an interview.
- Click Review and Send.
- Review the information displayed and click Schedule Send for scheduled emails or Send Now for invites to be sent immediately.
-
After you invite participants, you can:
- Send reminders to participants.
Remind participants to select a scheduled timeslot, or remind them of their confirmed interview.
- When you create a
schedule reminder, the status options are:
- Invited, but not started
- Incomplete
- Confirmed
- Completed
- When you remind confirmed participants, select Confirmed in the Participation section on the Recipients tab.
- When you create a
schedule reminder, the status options are:
- Send reminders to participants.