Create a reminder

Increase response rates by sending an email reminder to complete an activity. Aside from reminders, you can also use this functionality to send follow-ups or sharebacks after activity completion.

Create the reminder

Provide an internal name for the reminder and assign it to a Community.

  1. Open the activity.
  2. Click the Distribute tab.
  3. Click New > Reminder.
    Note: If you are creating a reminder for a recruitment survey, select Reminder from the list.
    Result: The Create New Reminder dialog appears.
  4. In the Name field, type an internal name for the invitation.
  5. From the Assign to a Community list, select one or more Community.
    This step applies to customers with multiple communities. If you select multiple communities, an reminder will be created for each of the selected communities.
  6. Click Create.
    Result: The Message tab appears.

Compose the email reminder

Write the body of the reminder. You can also save the reminder as a template.

If you created reminders for multiple communities, you can switch between reminders by selecting the reminder to compose from the Communication drop-down list. This allows you to compose the emails for multiple communities without leaving the Message tab.

  1. Optional: Load an email template.
  2. In the Subject field, type the email subject.
    Note: The From email address is set at the Community level. For more information about Community settings, see View or edit community settings.
  3. In the text field, write and format the email body.
    For more information, see Edit the email body.
  4. Optional: Append member IDs or profile variables to the ActivityLink pipe.
  5. Optional: Insert variables such as the recipients first and last name in the email.
    Tip:
    • You can type [%FirstName%] and [%LastName%] if you want to insert recipients' first or last names, respectively. If the first or last name values do not exist, [%FirstName%] and [%LastName%] will be replaced by empty spaces.
    • To insert any profile variable, type [%ProfileVariableName%], where ProfileVariableName is the exact name of the profile variable as it appears in the application. For example: [%country%]
  6. Optional: In the Email Footer area, click Edit to edit the email footer.
    Result: Changes to the email footer are applied to all future messages for the specific Community.
  7. Optional: Click Test Email to view the reminder from the recipient's perspective.
  8. Optional: Save the email body as a template.

Select the recipients

Filter the invited participants who will receive this reminder.

If you created invitations for multiple communities, you can switch between reminders by selecting the reminder to work with from the Communication drop-down list. This allows you to define the reminder recipients for multiple communities without leaving the Recipients tab.

  1. Click the Recipients tab.
  2. In the Invitations area, select the open and pending invitations for which you would like to send the reminder.
    • Click Name, Status, or Sent/Scheduled Date to sort the invitations in ascending or descending order.
    • For Single Response survey reminders, and scheduled video discussions reminders, you can select the checkbox next to the Name column title to select all of the listed invitations (excluding any unsent, closed, or failed invitations included in the table).
    Note:
  3. In the Participation Status area, select which participation status you want to include in this reminder.
  4. Optional: Select More Filters.
    This step does not apply to recruitment surveys.
    Tip: Using a member filter to target your reminder will help increase participation for a specific demographic.
    Result: The Total Eligible Recipients is updated to show the number of members who will receive the reminder.

Schedule the reminder

You have the option of sending the reminder immediately or selecting a date and time in the future.

If you created reminders for multiple communities, you can switch between reminders by selecting the reminder to work with from the Communication drop-down list. This allows you to schedule reminders for multiple communities without leaving the Schedule tab.

  1. Click the Schedule tab.
  2. Optional: Click Test Email to view the reminder from the recipient's perspective.
  3. In the Send Date area, select when to send the reminder.
    • Now: Sends the reminder upon confirmation.
    • Later: Opens a calendar to select a date and time in the future.
    Note: You need to click Review and Send to send the invitation now or later.

Review and send the reminder

Review the details in the confirmation summary before sending the reminder.

  1. If you created reminders for multiple communities, ensure that the correct reminder is selected in the Communication drop-down list.
    The Communication drop-down list allows you to review and send reminders for multiple communities without leaving the Distribute page.
  2. Click Review and Send.
    Result: The Confirm Communication dialog appears. If there are any errors in the communication, they will be displayed here and you will be prevented from sending.
  3. Click Send Now or Schedule Send.
  4. If you added a schedule to the reminder, look for these indications that your email was scheduled successfully:
    • A green notification message appears and says "The communication has been scheduled to be sent" at the specified date and time.

      Tip: If you need to unschedule the email, click Cancel Communication inside the notification message. The status of the email will change from Scheduled to Not Sent.
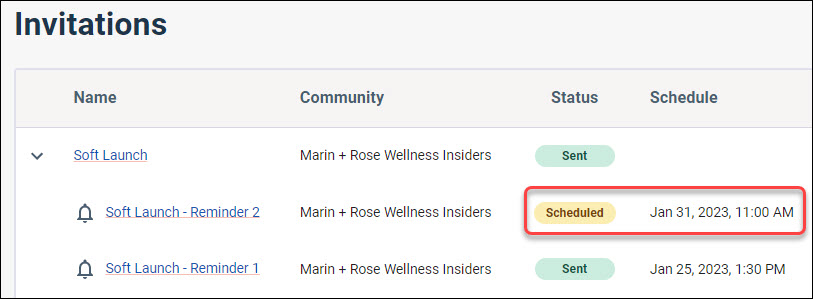
    • In the Invitations table, the reminder is nested under its parent invitation with a bell icon. To expand the list of reminders, click the bell icon.

      Note: If a reminder has not been associated with an invitation, it appears on its own row of the table. On the Recipients tab, complete setup by selecting the open and pending invitations you want to send the reminder for.
    • In the Invitations table, the email's status appears as Scheduled and the date and time of send appears under the Schedule column.

    For more information, see Scheduling.