 Create a Single Choice or
Multi Choice question
Ask participants to select one answer from a set array of answer options.
- In Power Survey Authoring, click the Questionnaire tab.
-
On the
Questionnaire tab, do either of the following:
- On the toolbar, click Question, hover over Single Choice, and select Single Choice.
- Click Question, hover over Multi Choice, and select Multi Choice.
-
Type a name for the question, and then click
OK.
For guidelines on question names, see Question names.
-
Add the question text.
-
Click the
Question field, and then type the
question text.
For information on formatting the text and adding files such as images, see Editing toolbar.
- Click Update.
Note:- The application automatically removes any Javascript that you add to question text, instruction text, or content boxes.
-
Click the
Question field, and then type the
question text.
- Optional: Under the Question field, click the instruction text field to edit the instruction text, and then click Update.
-
Add one or more answers.
Below the participant instruction text box, there are four buttons under the headings Add and Batch Edit.

- Add one answer
at a time.
- Under Add, click Answer.
- In the Input dialog, type the answer text, and click OK.
- Repeat these steps until you have added all the answers you want.
- Add answers in a
batch.
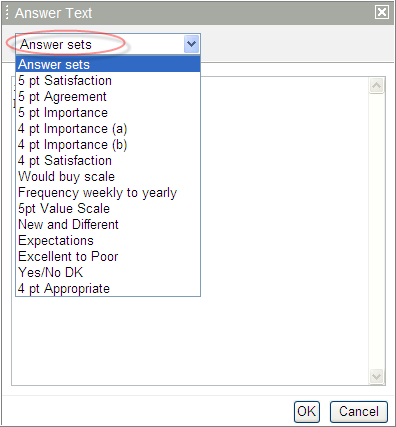
- Under Batch Edit, click Answer Text.
- In the
Answer Text dialog, type the answers or
select a predefined set from the
Answer sets list.
Press Ctrl + V to paste multiple answers from a text editor such as Notepad.

- Add one answer
at a time.
- Optional:
Add an image to each answer.
Tip: If you are going to add images to each answer, we recommend that you create a Buttons question for a more visually appealing participant experience. For more information see, Create a Single Choice or Multi Choice Buttons question.
-
Click the
Edit Answer button.

-
On the Editing toolbar, click the
Image Manager button.

-
Select an image or click
Upload to upload an image.
For information on formatting the image, see Add an image to a question text or email.
- Click Insert > Update.
-
Click the
Edit Answer button.
- Optional:
Configure your answer properties.
-
Click the
Properties menu.

-
From the list, select
Header or
Answer (Other-Specify).
Note:
- Select Header to set the answer option as a header.
- Select Answer (Other-Specify) to allow participants to provide a verbatim answer.
-
Click the
Properties menu.
- Optional:
Set the
Answer (Other-Specify) answer to
automatically purge the text field data after the
participant becomes inactive.
-
After you add the
Answer (Other-Specify) answer, click
Save.
Result: The question properties are refreshed.
-
In the
Properties section, under
Sensitive Data, click
Treat other/specify text response as sensitive
data.
Note:
- Only Admins can change this setting.
- Sensitive Data is available on request. For more information, see Purging sensitive data.
- You cannot recover the answer data after it is purged.
-
After you add the
Answer (Other-Specify) answer, click
Save.
- Optional:
Set an answer as
Exclusive.
Note: The Exclusive option does not appear in Single Choice question types.
 Result: Any participant who selects this answer will not be able to select another.
 - Configure your question properties.