Create a survey theme

Create different themes for different surveys.

Tip:
  • Designing a theme for classic surveys, modern surveys, or both? Keep these considerations in mind:
    • For modern and classic surveys, you must edit the Surveys section.
    • For classic surveys, you must also edit the Surveys (Classic) Mobile section.
  • Survey themes render differently depending on whether you are building a classic or modern survey. For more information, see Community themes.
  • To quickly create different themes for different surveys, first duplicate a theme (so you don't have to reset the Portals/Discussions settings). Then, edit the survey settings only.
  • To make a survey theme visible to participants, set the theme in the survey invitation or the survey link. For more information, see Create an invitation and Create a new activity link.
Note:
  • If you edit a theme in a live survey, only the participants who have yet to start the survey will see the changes.
  • If you have multiple communities that use the same domain (e.g. www.my-community.com and fr.my-community.com), the communities sharing the domain are limited to sharing a single theme.
  1. Open the Community app and click Community > Member Experience at the top of the page.
  2. Click Theming.
  3. Copy an existing theme.
    1. On the left-hand side, click the theme you want to copy.
    2. Click Menu, and select Duplicate.
    Result: The copied theme appears on the left-hand side with the theme name copiedTheme - Copy.
  4. Open the copied theme.
    Warning: Any changes you make to the settings in the Portals/Discussions Header & Navigation area are immediately visible to community members once the theme is set to active, even if you are distributing a survey to nonmembers.
  5. In the Theme Name field, enter a new name for the theme.

The next few steps involve uploading survey theme images, selecting colors, and choosing fonts.
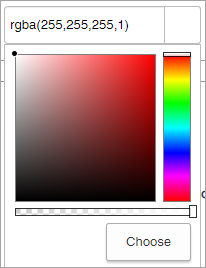
For the color pickers:

  • Click anywhere inside the ombre square to select a shade.
  • Use the color slider to select a different color.
  • Type a color code. Accepted formats include:
    • RGB
    • RGBA
    • HEX
  • To change the opacity, type the color code as an RGBA value. The A value can range from 0 (completely transparent) to 1 (completely opaque). Alternately, use the opacity slider.

For the fonts, available options include:

  • Arial
  • Georgia
  • Hand of Sean
  • Helvetica
  • Montserrat
  • Open Sans
  • Raleway
  • Roboto
  • Times New Roman
  • Verdana

To upload an image:

  • Click Upload File.

    If you are replacing an existing header image, click the red X next to the image name.

  • Click Browse, select your image, and click Open.
  • In the Alternative Text (required) field, type a description of the image that can be understood by text-only readers.
  • Click Add.
  • To remove an image, click the red x beside the file name.

  1. In the Surveys section, edit the survey header settings.
    1. Upload a Header Image.
      Header Image
      • Supported file type: JPG, PNG, and GIF
      • Maximum file size: 2 MB
      • Classic surveys:
        • The header image appears in desktop view.
        • Recommended height: 100 pixels
        • Recommended width: 987 pixels. An image with a width of 987 pixels will stretch from the left edge to the right edge of the content area.
      • Modern surveys:
        • The header appears across all devices types and does not adjust to the size of the participants' screens.
        • Recommended height: 100 pixels.
        • Recommended width: 400 pixels
        • Larger images are resized to 100 pixels height and the aspect ratio of the width is maintained.
        • To avoid unintentionally cropping the header image on smaller screens, try:
          • Using a narrower header image.
          • Experimenting with Header Alignment options.
    2. Select options for these settings:
      • Header Alignment
      • Header Background Color
  2. Edit the survey body settings.
    1. Upload a Page Background Image.
      Page Background Image
      • Maximum file size: 2 MB
      • Recommended width: 1920 pixels
      • Recommended height: 1080 pixels
    2. Select options for these settings:
      • Page Background Color
      • Question Container Background Color
      • Text Color
      • Question Font
      • Answer Font
  3. Edit the survey footer settings.
    1. Upload a Footer Logo.
      Footer Logo
      • Supported file type: JPG, PNG, and GIF
      • Maximum file size: 2 MB
      • Recommended width: 180 pixels
      • Recommended height: 30 pixels
    2. Select options for these settings:
      • Footer Font
      • Footer Font Color
    3. Select or clear Show Footer Text and edit the Footer Text.
  4. Edit the Surveys (Classic) Mobile settings.
    1. Upload a Mobile Header.
      Mobile Header
      • Supported file type: JPG, PNG, and GIF
      • Recommended width: 640 pixels
      • Recommended height: 100 pixels
      • Maximum size: 2 MB
      1. Click Upload File.

        If your are replacing an existing header image, click the red X next to the image name.

      2. Click Browse, select your image, and click Open.
      3. In the Alternative Text field, type a description of the image that can be understood by text-only readers.
      4. Click Add.
      5. To remove an image, click the red x beside the file name.
    2. Select options for these settings:
      • Header Background Color
        Tip: Pick a color that matches the header image background. That way, if someone is viewing the survey on a screen wider than your header image, the header will still appear contiguous.
      • Page Background Color
      • Question Font Color
      • Answer Font
      • Help Background Color
      • Help Font Color

      For more information about the different theme elements, see Community themes.

  5. Optional: Click Publish to save changes to a theme, or to make changes to an active theme live.
  6. Optional: To close the theme editor without saving changes, click Undo Changes, and then click Undo Changes again when prompted for confirmation.
  7. Preview the new survey theme.
    1. Click Projects > Activities, and then select a survey from the list.
      Tip: Open the Activities page in a new browser tab so you can make adjustments to your theme and preview them in a survey. However, you cannot preview two versions of the same theme at the same time.
    2. Preview your survey theme.
Example

You want members and nonmembers to have different brand experiences when they participate in surveys. To achieve this objective, you create two themes:

  • Theme 1 has Surveys settings appropriate for members. You use Theme 1 for any surveys you distribute to members.
  • Theme 2 has Surveys settings appropriate for nonmembers. You use Theme 2 for surveys intended for nonmembers.