Create a Single Choice Grid Cards question

Ask participants to classify a series of cards according to answer categories.

Note: The information here applies to Card Sort in classic surveys only. In modern surveys, Card Sort is its own question type rather than a display option for Single Choice Grids. For more information, see Card Sort questions in modern surveys.

This display for Single Choice Grid questions is available to desktop participants only; mobile participants who access Single Choice Grid Cards questions will see the Grid display.

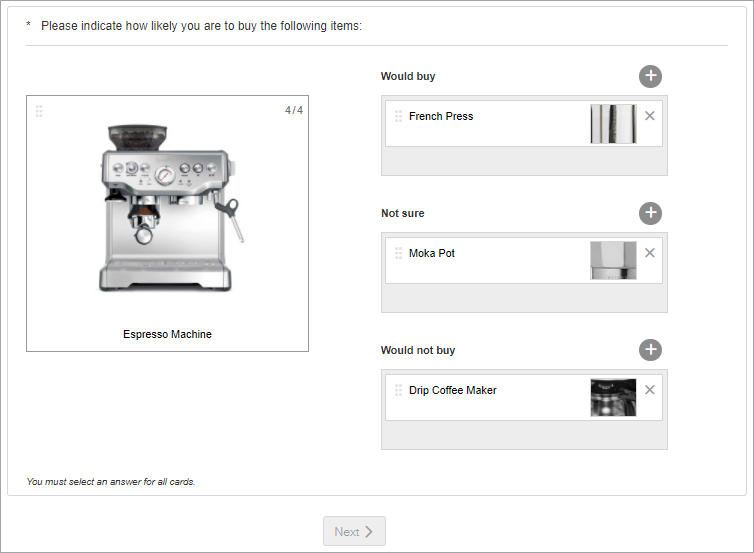
Use this display option when you want participants to sort a large number of items into discrete groups. Cards begin in a stack, and participants can focus on one item at a time, regardless of how many cards you ask them to sort. Cards are also useful when including lengthy attitudinal statements or images as these items appear more clearly than in a Grid display.

Tip: To ensure you collect the most accurate data, limit the number of categories in your question to five. If you include more than five categories, some will only be visible through scrolling. As a result, your data may suffer from bias towards the visible categories.
Single Choice Grid Cards from the participant's perspective

Sample classic desktop view:

Sample classic mobile view:

On mobile devices, Single Choice Grid Cards questions are displayed as Single Choice Grid questions with images.

  1. From the Survey Builder Toolbox, under Questions, do one of the following:
    • Drag the Single Choice Grid question to the Table of Contents.
    • Click the Single Choice Grid question.
  2. In the Table of Contents, click the Single Choice Grid question.
    Result: The Edit Pane appears.
  3. Optional: Edit the Question name.

    Question names:

    • Should be unique.
    • Can contain symbols and all alphanumeric characters.
    • Are not displayed to participants.
  4. In the Question text field, enter the question text.
    Note: The recommended character limit is 2500.
  5. From the Display answers as list, select Cards.

Tip: If this is a modern survey:
  • The only display option available is Carousel.
  • The Categories are Answers.
  • The Items are Statements.

  1. In the Categories fields, enter your category text.
    Tip:
    • The recommended character limit is 40.
    • To create a line break within an answer, type Shift+Enter if you are on a PC, or Shift+Return if you are on a Mac.
    • To create a new category, type Enter if you are on a PC, or Return if you are on a Mac.
    • To enter multiple categories at the same time, click Add Categories in Batch. For more information, see Add answers in a batch.
    • On desktop, categories are displayed as a single column if there are three or fewer categories. If the number of categories exceeds three, the categories are displayed in two columns.
  2. Optional: Add another category by clicking Add under the Category fields.
    Note: In a classic survey, the maximum number of categories is 12. (This limit does not apply to modern surveys.)
  3. In the Items fields, enter your card text.
    Tip:
    • To create a line break within an answer, type Shift+Enter if you are on a PC, or Shift+Return if you are on a Mac.
    • To create a new row, type Enter if you are on a PC, or Return if you are on a Mac.
    • To enter multiple values at the same time, click Add Rows in Batch. For more information, see Add answers in a batch.
  4. Optional: Add another card by clicking Add under the Item fields.
  5. Optional: From the Require participant to answer list, select the number of cards participants must classify.
    By default, participants must classify all the cards.
  6. Optional: Move a category or item by doing one of the following:
    • Grab the Handle on the left side of the column or row and move it up or down.
    • Click Options and select Move up or Move down.
  7. Delete a Category or Item by clicking Delete.
  8. Optional: Once you have authored your question, you can also:
  9. Optional: To preview the question in desktop or mobile view, in the Edit Pane, click Preview.
    Result: A preview of your survey appears, starting with the selected question.
    Note: Preview in mobile view simulates the mobile experience. For best results, preview your question on a mobile device.